I suppose that you have installed magento.
Login to Admin Panel.
Step 1: Create Website
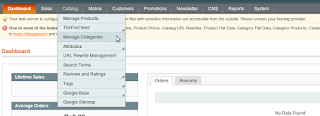
- Go to System –> Manage Stores
- Click on Create Website button and provide below details:
- Name = e.x. WebsiteOne
- Code = e.x. website_one
- Sort Order = e.x. 1
- Once you done with then click on Save Website button.
- Please find the below screen-shot for the same:

Step 2: Create Store
- Go to System –> Manage Stores
- Click on Create Store button and provide below details:
- Website = Choose the website which we have created in Step 1 say for e.x. WebsiteOne.
- Name = e.x. WebsiteOneStore
- Root Category = Select appropriate category for website OR choose the default category.
- Once you done with then click on Save Store button.
- Please find the below screen-shot for the same:

Step 3: Create Store View
- Go to System –> Manage Stores
- Click on Create Store View button and provide below details:
- Store = Choose the store which we have created in Step 2 say for e.x. WebsiteOneStore.
- Name = e.x. WebsiteOneStoreView
- Code = e.x. website_one_store_view
- Status = Select Enabled option.
- Sort Order = e.x. 1
- Once you done with then click on Save Website button.
- Please find the below screen-shot for the same:

Step 4: Change Link URL
- Go to System –> Configuration
- Change 'Current Configuration Scope' to 'WebsiteOne' (in left hand corner).
- Go to System –> Configuration -> GENERAL -> Web
- Goto to Unsecure and Secure tab (present in right hand side)
- Change Base Link URL = e.x. http://yourwebsite.com/magento/websiteone/ (i.e. websiteone is a folder name which we have given for our new website).
- Once you done with then click on Save Config button.
- Please find the below screen-shot for the same:

Step 5: Create a new folder named 'websiteone' inside 'magento (OR whatever project name given)' folder.
- Copy index.php and .htaccess file from your magento folder to websiteone folder.
Step 6: Open index.php of websiteone folder:
- Change $compilerConfig = 'includes/config.php'; to $compilerConfig = '../includes/config.php';
- Change $mageFilename = 'app/Mage.php'; to $mageFilename = '../app/Mage.php';
- Change Mage::run(); to Mage::run('website_one','website’);
- Clean up your Cache.
Finally, you have created a new website for your magento shop. Your base website can be browsed by http://yourwebsite.com/magento/ and your new website can be browsed by http://yourwebsite.com/magento/websiteone/
Hope this help!
Njoy!
Login to Admin Panel.
Step 1: Create Website
- Go to System –> Manage Stores
- Click on Create Website button and provide below details:
- Name = e.x. WebsiteOne
- Code = e.x. website_one
- Sort Order = e.x. 1
- Once you done with then click on Save Website button.
- Please find the below screen-shot for the same:

Step 2: Create Store
- Go to System –> Manage Stores
- Click on Create Store button and provide below details:
- Website = Choose the website which we have created in Step 1 say for e.x. WebsiteOne.
- Name = e.x. WebsiteOneStore
- Root Category = Select appropriate category for website OR choose the default category.
- Once you done with then click on Save Store button.
- Please find the below screen-shot for the same:

Step 3: Create Store View
- Go to System –> Manage Stores
- Click on Create Store View button and provide below details:
- Store = Choose the store which we have created in Step 2 say for e.x. WebsiteOneStore.
- Name = e.x. WebsiteOneStoreView
- Code = e.x. website_one_store_view
- Status = Select Enabled option.
- Sort Order = e.x. 1
- Once you done with then click on Save Website button.
- Please find the below screen-shot for the same:

Step 4: Change Link URL
- Go to System –> Configuration
- Change 'Current Configuration Scope' to 'WebsiteOne' (in left hand corner).
- Go to System –> Configuration -> GENERAL -> Web
- Goto to Unsecure and Secure tab (present in right hand side)
- Change Base Link URL = e.x. http://yourwebsite.com/magento/websiteone/ (i.e. websiteone is a folder name which we have given for our new website).
- Once you done with then click on Save Config button.
- Please find the below screen-shot for the same:

Step 5: Create a new folder named 'websiteone' inside 'magento (OR whatever project name given)' folder.
- Copy index.php and .htaccess file from your magento folder to websiteone folder.
Step 6: Open index.php of websiteone folder:
- Change $compilerConfig = 'includes/config.php'; to $compilerConfig = '../includes/config.php';
- Change $mageFilename = 'app/Mage.php'; to $mageFilename = '../app/Mage.php';
- Change Mage::run(); to Mage::run('website_one','website’);
- Clean up your Cache.
Finally, you have created a new website for your magento shop. Your base website can be browsed by http://yourwebsite.com/magento/ and your new website can be browsed by http://yourwebsite.com/magento/websiteone/
Hope this help!
Njoy!


